|

Age Range: 7 to 12
Grade Range: 2 to 6
Skill Level: Easy
Appropriate for These Special Events:
Every Day and Rainy Days
Supports Subject Area(s) of:
Language Arts – e.g. step by step instructions
Mathematics - measuring
Visual Arts
Time Needed for Project:
1 hour
Main Materials:
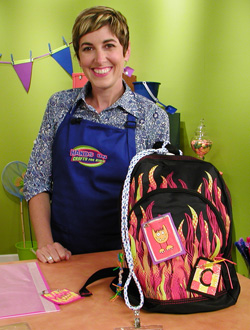
Backpack or canvas tote bag
Elmer's® Painters paint markers
Rubber stamps
Stays-on ink pad
Pepperell Rexlace™
Pepperell jelly bands
Horizon silver letter beads
Horizon neon pony beads
Sakura® micron permanent fine tip
2 Lanyard hooks
Pepperell Bonnie cord
Elmer's® Craft Bond Tacky glue
Pepperell jumbo wood bead
Split key ring
Basic Materials:
Pencil
Safety pins
Craft felt
Patches:
1. Determine size of patch rectangle according to rubber stamp size. Draw the rectangle on canvas piece with a pencil.
2. Color the rectangle with painter pens---it can be patterned or solid. Leave to dry or use a hair dryer.
3. Stamp design on the rectangle with permanent ink.
4. Color design with paint pens and leave to dry.
5. Outline design with fine tip pen.
6. Cut rectangle out and glue onto felt. Cut felt rectangle leaving a small border.
7. Pin to backpack. Optionally, you can add a Rexlace™ tassel with beads to the loop on the safety pin.
Zipper pull:
1. Cut a piece of Rexlace™ 8" and knot to a lanyard clip so both ends are even.
2. String pony beads and letter beads onto both ends of the Rexlace™.
3. Knot pieces of bracelet jellies in between each of the beads and trim.
4. Finish the end of the Rexlace™ with an overhand knot.
Rope ID Lanyard:
1. Determine length of lanyard and add 1".
2. Thread the two ends through the key ring. With the ring centered, put the tails through the loop of rope and pull snug.
3. String the wood bead onto the rope end. Glue the ends together and glue the bead over the rope seam.
4. Link badge to lanyard ring with clip.
|