|
Age Range: 7 to 12
Grade Range: 2 to 6
Skill Level: Advanced
Appropriate for These Special Events:
Every Day, Rainy Days or Party Favors
Supports Subject Area(s) of:
Language Arts – e.g. step by step instructions
Mathematics - measuring
Visual Arts
Time Needed for Project:
1 hour
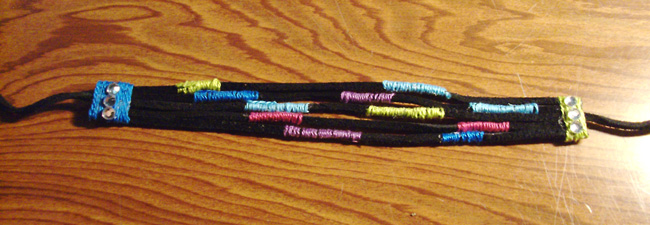
Leather Bracelet
Designed by Cheryl Ball
Main Materials:
Horizon Suede Lace Three Pack
Horizon Acrylic Jewels – crystal – 5mm
Horizon Friendship Thread – Brights and neons
Elmer’s® Craft Bond Tacky Glue

Basic Materials:
Scissors
Crayon
Instructions: Refer to photo for color and placement
- Determine length of bracelet by wrapping suede around wrist. Cut four more pieces the same length.
- Cut a 12” piece of floss. Pick up a suede piece then add a thin line of glue to one side of suede about 1” long. Press end of floss into glue then wrap around, wrapping closely to the end of glue. Cut off remainder of floss. Repeat step with remaining pieces, changing colors of floss and location on suede each section.
- Cut six 2” pieces of lacing. To connect ends together, start by lining up ends of wrapped pieces on work surface making sure all pieces are flat. Add a thin covering of glue to top about ½” wide across all five strands. Press three strips flat across end pressing to secure. Repeat with other end. Let dry then cut off excess along sides and across end.
- To create ties for a closure, cut two 4” lengths of suede. Add glue to one end of strip then press to underside of bracelet. Repeat with other end and let dry.
- Add glue around entire end of bracelet then tightly wrap with desired color of floss ending on the back. Trim off excess floss and let dry.
- Add dots of glue where desired for gems. Press tip of crayon to top of a gem then press into glue. The crayon will hold gem just long enough to set in glue. Add all gems where shown.
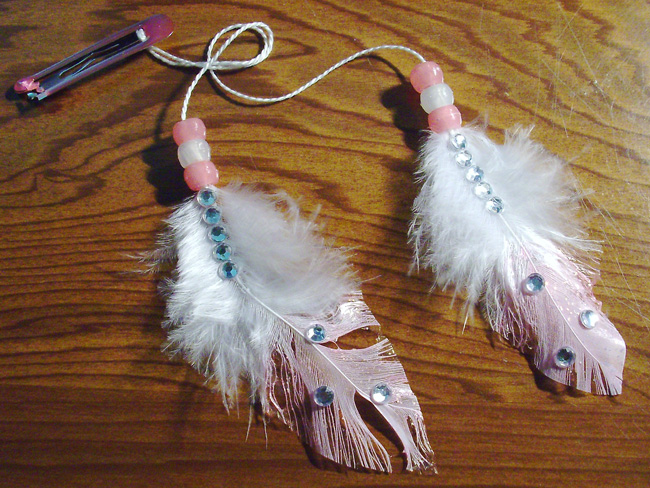
Glitzy Feather Clip
Designed by Cheryl Ball
Main Materials:
Horizon Acrylic Gems – 5mm crystal
Horizon Pony Beads – Glow in Dark
Horizon Feathers – white
Horizon Friendship Thread – white
Elmer’s® 3D Glitter Paint – Scented Glitter
Elmer’s® Craft Bond Tacky Glue
Basic Materials:
Scissors
Clip
Ruler
Crayon
Paintbrush
Damp paper towel
Foam plate or plastic lid
Instructions:
- Two feathers will be made.
- The feathers are different sizes and shapes in package. Find two that have a wide base and are basically the same width.
- Place feathers on foam plate. Squeeze a dab of pink glitter paint onto finger or paintbrush. Spread onto flat half of feather working from top to tip keeping feather spread and flat. Wipe finger with damp paper towel. Let dry then repeat step for deeper color. Let dry.
- Peel feathers from plate. To create shape, use scissors to cut painted section in a curved line to tip of feather as shown. Measure and cut feather up about 4” from tip then cut off top of feather. Trim unpainted feather if too wide matching lower half at sides.
- To make it easier for beads to slip on, use scissors to cut feathers next to shaft about ½” down from top. Cut a 14” length of white Friendship Thread. Apply a thin line of glue along trimmed shaft, press end of thread into glue then wrap tightly to the end.
- Thread three pony beads onto thread using desired colors and pattern. Apply a thin bead of glue over wrapped section then push beads into glue, adding more glue to thread if needed. Let dry.
- Add a thin line of glue about 1” along shaft of feather where shown. Use crayon to add acrylic jewels into place – press end of crayon onto top of jewel then position into glue. The crayon will hold just long enough to position. Add remaining jewels down shaft. Add three small dots to painted section of feather and add jewels. Let dry the add jewels to flip side.
- Pull both threads and adjust feathers slightly off-center. Tie ends to clip adjusting length then tie in several knots to secure. Trim thread ends.
|