|
Age Range: 7 to 12
Grade Range: 2 to 6
Skill Level: Advanced
Appropriate for These Special Events:
Every Day and Rainy Days
Supports Subject Area(s) of:
Language Arts – e.g. step by step instructions
Mathematics - measuring
Visual Arts
Time Needed for Project:
1 hour
Materials:
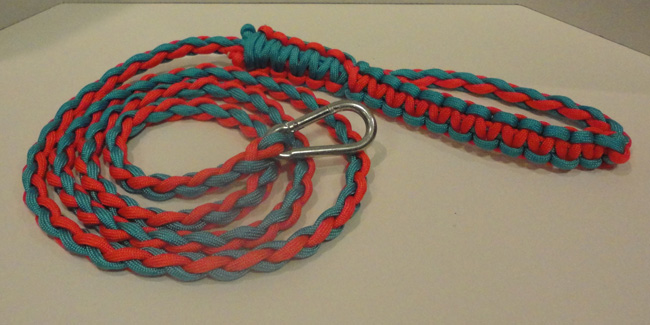
2 skeins of Pepperell Braiding Co. Parachute Cord™
Spring latch for end of leash
Elmer's® Craft Bond Tacky Glue
Tape

*This leash is recommended for small dog breeds.
Tip: Check out Pepperell Crafts Parachute Cord™ Project Book for excellent illustrations of braids and more project ideas. http://www.parachutecordcraft.com/Parachute-Cord-Project-Book_p_40.html
Instructions:
- Thread the two pieces of cord through the loop on the latch piece and secure to a sturdy surface with tape.
- Number each strand 1, 2, 3, and 4--far left cord is 1 and far right cord is 4. Cords should be laid out so the two on the left are one color and two on right are a different color. If it makes things easier, label each cord with a masking tape tag with the specific number.
- To start the braid, bring the #4 cord behind #3 and #2 and up and over #2
- Bring the #1 cord behind cord #2 and #4 and up and over #4.
- This is the basic lanyard stitch. Pull the cords as you go and you'll see the pattern emerge. Repeat the last two steps for four feet.
- Add to the cords tag labels: A, B, C, and D from left to right.
- Switch to a Cobra Stitch by bringing the D cord behind the C and B cords and on top of the A cord.
- Pick up the A cord and take the end over B and C cords and down through the loop that was made by the D cord. Pull the A and D cords snug, pushing the knot up towards the lanyard stitch. Keep the B and C cords nice and centered.
- Continue by crossing strand A over the B and C cords. The A cord then goes behind the D cord, pulling again on the A and D cords.
- Repeat the last two steps for 10".
- Switch back to the lanyard stitch for 4-6".
- Make the loop for the leash handle by folding the last cobra/lanyard section in half.
- Secure the loop with 6-8 full cobra stitches---when you bring the cords back and forth, include the initial lanyard stitch section in the center section with cords B and C.
- Tie off with knots and secure by the manufacturer's instructions or with thick craft glue.
|