|
Hands on Crafts For Kids is the resource for kids craft projects and instructions for kids 6-12 and parents, teachers and other group leaders. It includes school and curriculum based projects, multi cultural projects, and every day, holiday and seasonal ideas. |
| 1605-4 | Print | Close [X] |
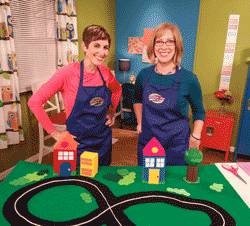
RACETRACK WITH BUILDINGS Watch the video for this project online at:
|
 |
Always cover your work surface with a mat or some type of protective covering like wax paper or plastic.
Age Range: 7 to 12
Grade Range: 2 to 6
Skill Level: Moderate
Appropriate for These Special Events:
Every Day and Rainy Days
Supports Subject Area(s) of:
Social Studies
Language Arts – e.g. step by step instructions
Mathematics - measuring
Time needed for project:
2 to 3 hours
Patterns: (Right click and choose "Save As" to download.)
Pattern 1 - Street
Pattern 2 - Lake
Pattern 3 - Bushes
Main Materials:
Elmer’s Display Board – 28” x 40”
Elmer’s® Craft Bond Tacky Glue
FloraCraft® Foam Blocks – 2” x4’x8” (2)
FloraCraft® Foam Blocks – 2” x 4” x4” (1)
Styrofoam™ Balls – 3” – (1)
Felt yardage – ½ yard black – 1 yard medium green
Felt sheet – magenta, red, white, blue, white, orange, lime green, ocean blue, brown, dark green, medium green, bright green
White yarn – 2 yards
Basic Materials:
Sewing pins
Toilet paper tube
Rubber band
Scissors
Craft stick
Serrated knife
Instructions:
Mat:
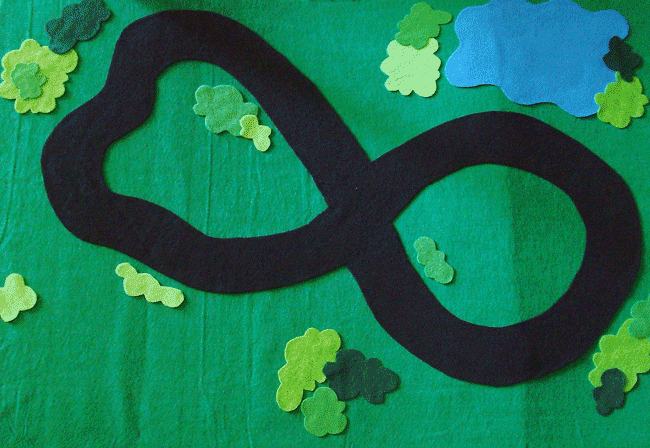
- Cut green yardage about two inches larger than display board. Working in sections, apply glue on edge and on board then use craft stick to smooth to edges and surface. Press felt into place. Repeat step with remainder of board. Trim excess from sides.
- Enlarge racetrack pattern to size indicated and cut out. Pin onto black felt and cut out. Position on board.
- Cut out remaining pattern pieces; pin on colored felt cutting out number desired. Position pieces on board referring to photo for reference then glue everything in place.
- To create line on road and working in sections, apply a thin line of glue down center starting and stopping at “X”. Press white yard into glue. Let dry.
Buildings:
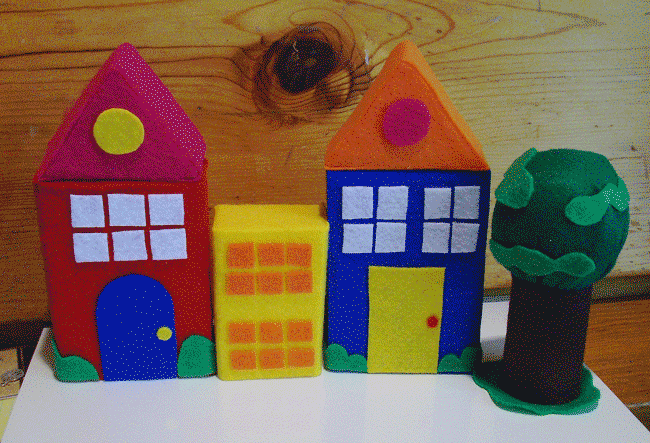
- Use knife to cut off top third from two foam rectangles. Cut corners from each of the smaller pieces to create roofs of buildings. Cut about 1” from one side of square foam piece to create smaller building.
- Cover pieces with felt. Apply a thin bead of glue around edges at one end then add more within center. Use craft stick to smooth glue to edges and across surface. Press onto felt. Use scissors to cut excess felt close to foam edges. Repeat with other end.
- Repeat step with sides, wrapping felt around sides then trimming close an needed. Cover all buildings and roofs.
- Cut out patterns from pattern sheet, pin on felt and cut out. Add windows and small bushes referring to photo. Glue everything in place but do not glue roofs to buildings – this way they could be interchanged if desired.
Tree:
- Cut brown felt about 1” longer than length of tube. Glue felt around tube. Snip in about every ½” or so on excess fabric at ends. Apply glue to inside of tube then fold felt to inside.
- Place foam ball in center of medium green felt sheet then pull tightly over ball adjusting gathers. Use rubber band to hold ends in place. Trim ends to about 2”.
- Apply glue to inside edge at one end then insert cut end into place.
- Glue tube onto bright green felt and cut a wavy shape from excess referring to photo.
- Cut about five irregular shapes from medium green felt then glue onto tree.
Our Partners:
|

E-mail questions about Hands On Crafts for Kids to info@craftsforkids.com |