Age Range: 7 to 12
Grade Range: 2 to 6
Skill Level: Moderate
Appropriate for These Special Events:
Every Day and Rainy Days
Supports Subject Area(s) of:
Language Arts – e.g. step by step instructions
Mathematics - measuring
Visual Arts
Time needed for project:
1 hour plus drying time for paint and glue
Treasure Eggs
Designed by Lisa Galvin
Treasure eggs are perfect for both indoor and outdoor scavenger hunts! In this project YOU are the egg designer! Fill the sparkling eggs with surprises and use them over and over. Make a whole nest full for hours of entertainment!
Main Supplies:
Elmer’sÒ Classic Glitter Glue, Purple
Elmer’sÒ Classic Glitter Glue, Red
2 - 1.8” x 1.4” FloraCraft® StyrofoamÔ brand egg
1 - 2.4” x 1.8” FloraCraft® StyrofoamÔ brand egg
1 - 2.9” x 2.3” FloraCraft® StyrofoamÔ brand egg
1 - 2 7/8” x 3 13/16” FloraCraft® StyrofoamÔ brand egg
Acrylic paint (used here: Real Yellow, Bright Red, Lime Green, Turquoise)
6mm Neon Chenille Stems in orange, blue, lime, blue, purple and plain red
1/8” – 3/8” Ribbon Scraps in assorted sizes and colors
Purchased Grapevine Nest, found at craft supply stores (or cardboard box lined with shredded paper or leftover plastic Easter grass)
Egg fillers (Suggestions might include: plastic animals, dinosaurs or insects; candy; coins; or notes that lead to other eggs or a larger prize once the “finder” returns the egg to the nest!)
Basic Supplies:
Scrap piece of FloraCraft® StyrofoamÔ 1” sheeting
Plastic reclosable bags
Craft stick
Toothpicks
Metal spoon
Serrated knife
Old paintbrush
Scissors
Directions:
1. Cut eggs in half with serrated knife. Rub halves together to sand off any rough edges. Use craft stick to press lines or shapes into egg halves (if desired). We carved lines into our blue egg’s outer shell. Spoon out center of each egg half with metal kitchen spoon to create a cavity to place “treasures” in. Press center cavities with fingers to smooth. Set one 1.8” x 1.4” egg aside after cutting, it will not be painted with acrylic paint.
2. Pour a small amount of acrylic paint into a reclosable bag. Place an egg half into bag and close. Roll around inside sealed paint bag to coat, adding additional paint as needed to completely cover the egg half. Open bag and insert toothpick into one end of an egg half. Remove from bag and stick opposite end of toothpick into scrap piece of StyrofoamÔ sheeting to suspend until dry. Repeat for remaining egg half and dispose of bag. If using more than one paint color, repeat this step, using a separate bag for each color. Let eggs dry completely before continuing.
3. Decorate egg halves. Beginning with the two 1.8” x 1.4” eggs use an old paintbrush to brush each half with red Elmer’sÒ Classic Glitter Glue. (Note: on our examples, one of this egg size is painted red, the other is bare/not painted). Suspend on toothpick to dry. Use the purple and red Elmer’sÒ Classic Glitter Glue to decorate. We made dots and swirls on ours. Set aside to dry completely.
4. Egg hinges. Cut short 1” – 1 ¼” lengths of coordinating chenille stems. Fold each in half. With matching egg halves put together, insert ends of two folded chenille stems into bottom of each egg half, about ¼” from each edge.
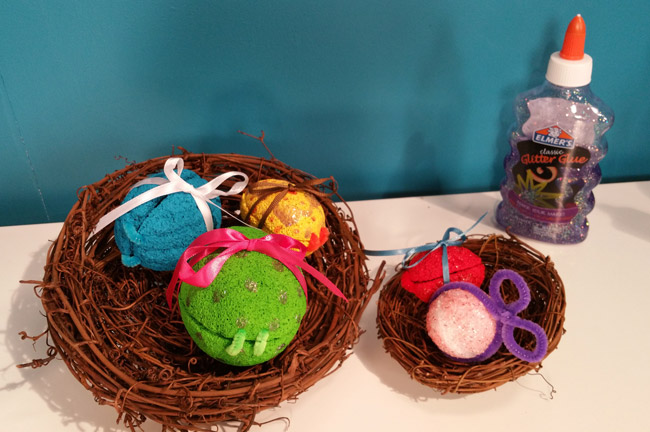
5. Open hinged egg and place treasure item (small plastic figure, coins, candy, etc…) into each. Close egg and tie a length of coordinating ribbon around thickest part to hold the treasure inside. As shown in our red egg here, you can secure your ribbon to each egg by cutting a 1”-1 1/4” length of chenille stem, fold it in half, and insert into bottom center of one egg half, trapping ribbon beneath the fold.
Another closure option: As shown in our pink egg here, you can also use chenille stems to hold eggs closed. Simply wrap the chenille stem around the egg, twist 1-2 times, make loops on ends and trim excess stem.
6. Have someone hide your eggs. Ready, set, go search for those eggs! Don’t forget to return them to your nest so that they can be filled and ready for your next scavenger hunt!
|