www.craftsforkids.com

Hands on Crafts For Kids is the resource for kids craft projects and instructions for kids 6-12 and parents, teachers and other group leaders. It includes school and curriculum based projects,  multi cultural projects, and every day, holiday and seasonal ideas.

It is  the online home of the public television program Hands On Crafts for Kids.

1902-4 Print | Close [X]

COILED RAG BASKET
Jenny Barnett-Rohrs coils a rag basket with a touch of denim.


Hosts:
Jenny Barnett-Rohrs

When you see the “helping hand” symbol on a project, it means you may need adult supervision to do the project.


Always cover your work surface with a mat or some type of protective covering like wax paper or plastic.
                                                    
Always use care when using tools or a heat source. Be careful and safe!

Age Range: 7 to 12

Grade Range: 2 to 6

Skill Level: Moderate

Appropriate for These Special Events:
Every Day, Gift Giving and Rainy Days

Supports Subject Areas of:
Language Arts – e.g. step by step instructions
Mathematics - measuring
Visual Arts

Time needed for project:
1 hour

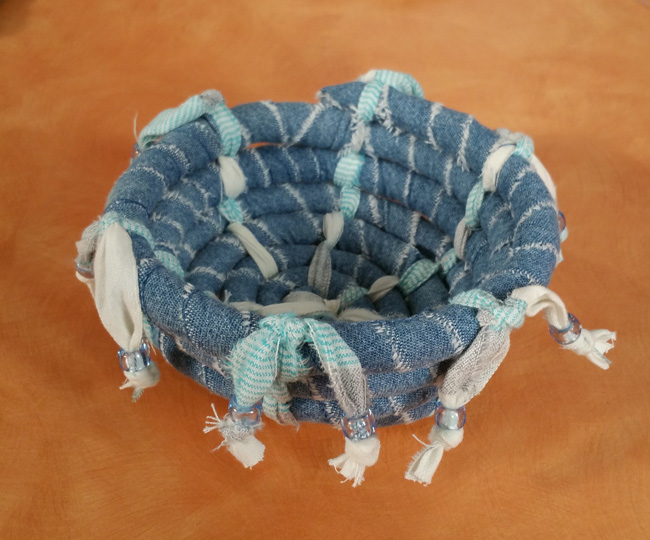
Denim Coiled Rag Basket
Designed by Lisa Galvin
Materials needed:
Pepperell® Braiding Company: 

  • 6 foot length ½” Paper coiling cord
  • EZ Beader™ tool

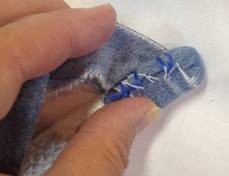
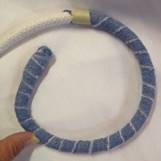
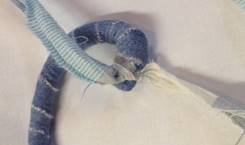
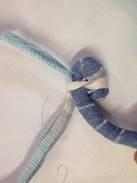
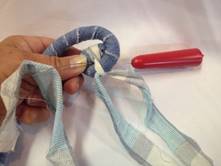
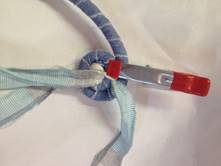
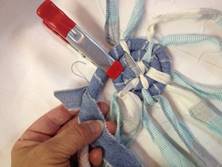
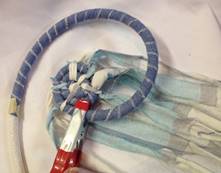
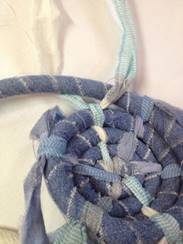
*6” x 44” piece scrap, 100 percent cotton fabric
*7” x 38” piece of light-weight denim fabric from an old shirt, skirt or jeans
20” length Embroidery floss (in coordinating color)
Elmer’s® CraftBond® Tacky glue
Twelve 8mm translucent medium blue pony beads
Masking tape
Ruler
Scissors
Extra-large office-style binder clip (or hardware clamp)
*For best results, denim and cotton fabrics should be prewashed. 

DIRECTIONS:
1.  Measure, then cut a 2 ½” square of denim fabric and set aside.  Beginning at narrow end of denim measure, then use scissors to make a 1” cut.  Set scissors aside.  With one hand on the loose 1” tab, the other on opposite side of the cut, pull in opposite directions down the 38” length of denim.  Repeat, tearing remaining denim into 1” strips.  Repeat to tear coordinating cotton fabric into six 1” x 44” strips.
Measure and mark a six-foot length of paper coiling cord, wrapping masking tape at cut line to preserve cord end, preventing fraying as you work.  Cut to length with scissors. 
Keep scissors handy to cut excess threads that may fray and tangle as you work.

2.  Remove tape from one end only of paper coiling cord, center 2 ½” square piece of denim over end, draping fabric down length of the cord and pressing tightly around the cord.  A small piece of tape near edges of denim fabric can be used to hold.  Wrap with embroidery floss to hold in place and tie an overhand knot.  Trim excess floss and remove tape.

3.  Wrap end of one 1” denim strip tightly around same cord end, covering embroidery floss.  Continue wrapping cord, overlapping ¼” as you go.  Once you reach end of first denim strip, use masking tape hold end in place while you begin coiling. 
NOTE:  Additional denim strips will be added when needed as you continue to build your coiled basket (See images 1 and 2).  As you work toward the end of wrapped cord length, remove tape from previous strip end, slip end of a new denim strip about 1 ½” under previous strip end, pinch tightly with fingers to hold in place, then begin wrapping the new strip around cord just as before.  Continue wrapping to end of the next strip and use tape to hold in place once again.  Repeat this process as needed throughout the basket making process.

4. Coiling – Once first section of cord is wrapped in denim, fold ends of one cotton fabric strip in half and slip loop over denim wrapped end of coiling cord. Tie fabric strips around cord using an overhand knot.  Before pulling knot to tighten, make sure that fabric strip ends are equal on both sides (See image 3).  Begin coiling by bending wrapped cord end tightly against itself in a snail-like fashion, keeping knot between the coiling.  Use an office binder clip or hardware clip to help hold the position as you wrap the same fabric strip ends around the opposite coil and tie a knot. (See image 4). 
Continue to coil, using EZ Beader® tool to pull fabric strips between coil layers, wrapping them around adjoining cord, then tying knots to secure each in place.  Space the six fabric strips strategically and fairly evenly as you work your way around basket bottom, referring to project photo for placement.  Move binder clip (or clamp) around coil as you go to better hold pieces together while tying (See images 5 – 8).  Knots should be positioned on outer edge of coil for the 3-4 rows that make up basket bottom.

5.  Basket sides and top.  To coil upward, position wrapped cord above the previous row, wrap the cotton fabric ends around coil and tie an overhand knot on top of wrapped cord.  Continue to work your way around, always stacking the next coiled section on top of the previous row until you are within 6” of end.

6.  Finishing touches. If cord end is wrapped, remove denim wrapping from end.  Remove tape from end.  For best results, make sure that end will fall to within 1” of the last fabric tie, so that it can be knotted securely in place.  Trim excess cord (if needed).  Use scissors to make a 2-3” diagonal cut on bottom side of exposed paper cord.  Set scissors aside and re-wrap cord end with denim strip.  Do not cut excess denim from end.  Wrap and knot remaining fabric tie ends so that exposed knots circle top of basket.  Use EZ Beader® tool to slip 2-3 inches of remaining denim at cord end around the cord below top layer and back through a few of the denim wrapped layers. Once end is secured, trim any excess denim remaining.
Use EZ Beader® tool to slip a pony bead onto end of each fabric tie.  Tie an overhand knot to secure bead in place.  Trim excess fabric just below knots and any stray threads on basket with scissors.

Images for Reference

Image 1

../../IMG_4091%20(1).jpg


Image 2
../../IMG_4093.jpg


Image 3


../../IMG_4099%20(1).jpg


Image 4

../../IMG_4100.jpg

I


mage 5

../../IMG_4101%20(1).jpg


Image 6

../../IMG_4102.jpg


Image 7


../../IMG_4103.jpg


Image 8

../../IMG_4104%20(1).jpg


Image 9
../../IMG_4108.jpg


Our Partners:


www.pepperell.com

www.elmers.com