| |
 |
|
|
|
|
 |
|
|
| |
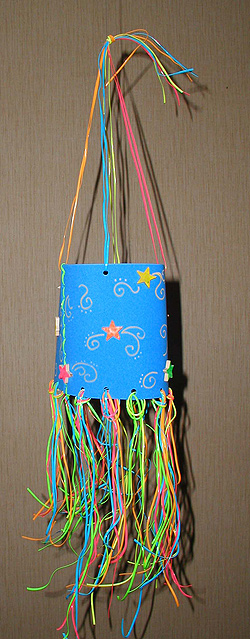
Star Windsock
1004-1
|

|
Main supplies:
- Fun Foam
– Blue
- Elmer’s®
Squeeze and Brush®
- Elmer’s®
Glue-All®
- Walnut Hollow®
Wood Stars – 1”
- Pepperell
Crafts Plastic Lacing – Neon colors
- Elmer’s®
Painters® Opaque Paint Marker - yellow
Basic Supplies:
- Fiskars®
¼” hole punch
- Fiskars®
scissors
- Cardboard
- Tape
- Paper towels
|
Instructions:
- Use scissors to cut
foam sheet in half widthwise.
- Use the hole punch
to punch 9 holes about ½” apart down each of
the shorter sides. Punch 6 along one long side about ½”
from edge, and 2 on the remaining side.
- Apply strips of tape,
sticky side up to cardboard. Press stars onto tape. This
will make painting them easier.
- Start the flow of
orange Squeeze and Brush on paper towel then tap onto just
the top of each star. Paint each star desired colors. Set
aside to dry .
- To connect the two
foam pieces together, cut two 30” pieces of Green
plastic lacing. Fold in half. Line the edges of the two
pieces overlapping at holes. Insert one end of lacing through
both holes and continue lacing up side. Insert other end
of lacing from opposite side and continue lacing up same
side, filling in areas between holes, refer to photo for
placement. Repeat step with other side, creating the windsock.
Trim ends to about an inch.
- To create fringe
for windsock, start by lining up ends of three colors of
plastic lacing. Measure off 24” and cut all three.
Fold all three pieces in half at center and insert into
one of the holes from the front to the inside. Pull out
loop then insert ends through loop. Carefully pull ends
to tighten knot. Continue with remaining fringe.
- Cut four 30”
lengths of four different colors of plastic lacing. Thread
a single color though each hole then tie a knot with ends.
- Apply glue to the
back of a star then press in place on windsock where desired.
Hold in place with small piece of tape if needed till dry.
Continue with remaining stars.
- Remove tape. Prime
yellow paint marker following label instructions then add
swirls and dots from each star.
Sponsored By:
|
| |
|
|
Home
| Television | Projects
| Book Order | Helping
Kids | Teachers | Philosophy
E-mail questions about Hands On Crafts for Kids to info@craftsforkids.com
© Copyright 2004 Katherine Stull, Inc.
|