| |
 |
|
|
|
|
 |
|
|
| |
Four Seasons Tiles
By Patty Cox
1004-5
 When
you see the “helping hand” symbol on a project, it means
you may need adult supervision to do the project. Always use care
when using tools or a heat source. Be careful and safe! When
you see the “helping hand” symbol on a project, it means
you may need adult supervision to do the project. Always use care
when using tools or a heat source. Be careful and safe!
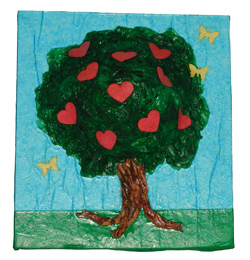
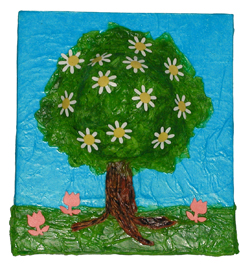
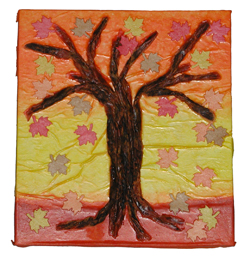
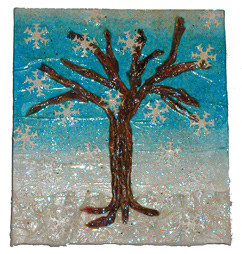
Create these decorative dimensional
tiles using foam core and tissues maché.
|
| 
|
Main supplies:
- Elmer’s®
Glue-All®
- Elmer’s®
Foam Board – cut into 4 5” x 5 ½” rectangles
- Elmer’s®
Galactic Glue™
- FloraCraft®
2 ½ Styrofoam® ball
- Non-bleeding
tissue paper
- Construction
paper
Basic Supplies:
- Sponge brush
- Fiskars®
paper punches – snowflakes, leaves, tulips, butterflies,
hearts, daisies
- Fiskars®
¼” hole punch
- Disposable
plastic bowl
- Plastic
craft knife
- Newspaper
|
Instructions:
- Cut four 5”
x 5 ½” rectangles from foam board. Mix one
part glue and one part water in a disposable bowl.
- Place foam board
on newspaper. Paint one foam board with glue and water mixture.
Place 6” x 6 ½” sky-colored tissue paper
over top surface of foam board. Paint glue mixture over
entire tile front. Tissue edges will be folded back later
when the tile is dry. Allow tissue edges to fall and stick
to newspaper.
- Paint lower 1”
of tile with glue and water mixture. Add tissue ground covering.
This can be applied flat like the mowed summer lawn, or
crumpled like the snow. Brush more glue mixture over tissue.
Optional: Apply glitter glue over the winter scene.
- Cut or tear 3”
x 5” pieces of brown tissue paper. Twist each lengthwise
into a 5” twist. Dip each twist into glue mixture.
Arrange on tile front as portions of the tree trunk (on
spring and summer) and as branches (fall and winter). Tear
shorter pieces of twist to add smaller branches. Brush over
tree trunks and branches with glue and water mixture.
- Cut a 2 ½”
foam ball in half with a plastic craft knife. Apply glue
on flat sides of foam. Stick one half of ball on the summer
tile and the other half of the ball on the spring tile.
Brush glue mixture over foam ball and tile front. Add flat
and crumpled pieces of green tissue paper over and around
foam ball. Continue brushing glue over each new layer of
tissue.
- Punch shapes form
construction paper. Add snowflakes, hearts, leaves, butterflies,
tulips and daisy blossom on tiles. Brush over tiles with
glue and water mixture. Allow tiles to dry.
- Trim tissue edges
¼” al around tile. Remove tiles from newspaper
backing. Glue edges to tile sides, folding and tucking tissue
at each corner.
Sponsored By:
|
| |
|
|
Home
| Television | Projects
| Book Order | Helping
Kids | Teachers | Philosophy
E-mail questions about Hands On Crafts for Kids to info@craftsforkids.com
© Copyright 2004 Katherine Stull, Inc.
|