|
This project features notes or instructions in Adobe Reader format. If you
do not have Adobe Reader, download it for free here. |
Click here to download the frame pattern. (PDF)
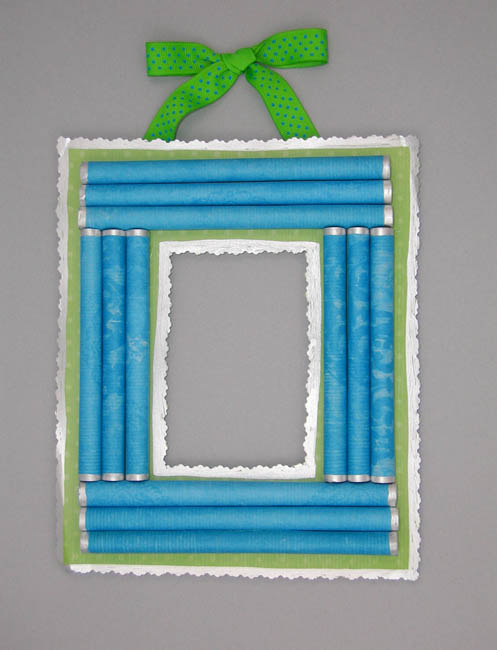
- Use pencil and ruler to measure and mark off six 6” x 3” and six 5” x 3” sections on back of turquoise paper. Cut apart.
- Place a few sections of paper towels on work surface.
- Place a section of paper lengthwise on paper towel. Swipe glue along the top half of paper making sure to run glue over edges. Immediately place dowel along unglued edge and start rolling paper. Hold finger along seam a few seconds till secure. Pull paper from dowel. Continue with remainder of papers moving to a clean section of paper towel for each.
- Trace the frame pattern onto white foam board. Carefully use the X-ACTO knife to loosely cut apart from main piece. Lay onto cutting mat then use X-ACTO knife to cut along pencil lines. Cut out center.
- Trace frame pattern onto back of lime paper. Use the decorative edges scissors to cut out frame leaving a ½” border from pencil line on all sides. Cut out inside leaving border.
- Press tip of Silver Metallic pen on scratch paper until paint flows to tip. Apply a thin line around each end of rolled paper and around inside and outside edges of lime frame. Let dry.
- Apply a liberal amount of glue stick to one side of foam board frame. Press into place on back of lime frame lining up pencil lines. Press to secure.
- Position rolls on front of frame, short along the sides and long along top. Run a thin bead from Glue Pen along seam of roll then press in place. Continue with remainder of rolls. Let dry.
- Tie a bow in center of ribbon. Apply glue to ends of ribbon then press in place at back of frame along top edge. Let dry.