1. Print pattern onto cardstock (or trace onto cardstock) and cut out.
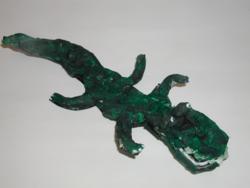
2. Cut 4 egg cups (one in front of the other) and dampen. Once saturated, flatten them down and apply a layer of glue to the back side. Begin molding the egg cups to become the alligator’s body and tail. Once a basic form is achieved, glue in place on top of the cardstock pattern. Continue molding till the body and tail are formed, and the pattern is hidden with just a space for the head left.
3. Cut 2 egg cups from an egg carton and dampen with water. Once saturated, fold in half to form the ‘jaws’ and head of the alligator. Mold using your fingers so that the head is flattened. Trim as needed to get a long ‘nose’. Glue in place above body, Use enough glue to firmly hold in place.
4. Dampen 2 more egg cups and cut legs out of them. Fold and mold the legs then glue in place. Use any remaining scraps to create two balls of paper. Put glue on the paper as you mold it so that the balls keep their form better, then adhere to the top back of the alligators head. These are the alligator’s eyes.
5. Using Elmer’s Squeeze ‘n Brush paints, (black and green) paint the alligator while it is still wet. This will allow you to blend the paints easily and get a nice mottled looking alligator skin. Set project aside to dry completely.
6. Once dried, cut teeth with scissors and paint with Opaque markers. Glue the teeth inside of the Alligator’s mouth, then use Elmer’s Opaque Markers to draw eyes and claws.
|


