| |
 |
|
|
|
|
 |
|
|
| |

By Alice Disney Huelskamp
Delta Technical Coatings, Inc.
|
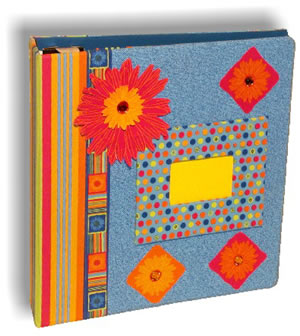 |
Main supplies:
- Delta FabriCraft™
peel ‘n’ stick fabric rolls – retro daisies,
retro dots, retro stripes, retro denim
- Delta FabriCraft™
peel ‘n’ stick fabric trims – retro solid trim,
retro stripes
- Delta Jewel
Glue
- Binder
- Small wood
frame
Optional supplies:
- Rhinestones
- Cardstock – red,
yellow
Basics supplies:
- Scissors
- Ruler
|
Instructions:
1. Measure the length
and width of the binder’s spine, adding four inches
to the width. Using these dimensions cut spine cover from
retro stripes fabric roll. (Make sure that the stripes go
the long way on the spine) Peel back a few inches of the backing
from the short side and center the piece on the spine of the
binder, allowing a two inch overlap on the front and back
covers of the binder. Carefully remove the paper backing as
you smooth the peel ‘n’ stick fabric to the binder.
2. Measure and cut a piece of retro denim fabric roll the
size of the remaining portion of the binder (front cover)
adding 1” extra to the width and 2” extra to the
length. Remove the paper backing and place the retro denim
piece centered on the front cover (butting the edges against
the retro stripe). You will have a 1” overlap of denim
to wrap along the inside edge of the cover and along the top
and bottom edges of the cover. Repeat this step for the back
cover of the binder.
3. Measure and cut a length of the retro stripes trim the
height of the binder plus an additional 2”. Remove paper
back and place centered on top of front cover where denim
and stripe fabric pieces butt together. Fold excess over to
inside of cover. Repeat this step for the back cover of the
binder.
4. Measure and cut a piece of retro dots fabric roll 1”
larger than the width and length of the wood frame. Remove
the paper backing and place centered over the frame. Wrapping
the ends to the back of the frame. Cut out the center of the
frame leaving ½” all the way around. Snip the
inside four corners and fold the ½” overlap to
the back of the frame. Glue frame to center of front binder
cover.
5. Cut out a large magenta daisy from the retro daisies fabric
roll. Peel off back and stick on a piece of red cardstock.
Smooth in place. Cut out the daisy. Repeat with a small yellow
daisy on yellow cardstock. Glue the small daisy to the center
of the large daisy. Glue the large daisy to the top of the
binder cover as shown.
Optional:
1. Cut out 2 small orange
daisies in magenta squares and one yellow daisy in an orange
square. Remove paper backing and adhere to the front cover
of the binder.
2. Glue rhinestones on centers of flowers.
3. Measure and cut pieces of retro stripes fabric roll to
cover inside binder covers. Measure and cut lengths of retro
solid trim to cover inside edges of binder cover.
|
| |
|
|
Home
| Television | Projects
| Book Order | Helping
Kids | Teachers | Philosophy
E-mail questions about Hands On Crafts for Kids to info@craftsforkids.com
© Copyright 2004 Katherine Stull, Inc.
|


