| |
 |
|
|
|
|
 |
|
|
| |

By Tammie Wilson
For Delta Technical Coatings, Inc.
|
 |
Main supplies:
- 2
Bricks
- Delta
Ceramcoat® acrylic paint – leaf green, blue mist, light
ivory,
crocus yellow, periwinkle blue, bright red, black
- Delta
Stencil Mania™ Bugged
- Delta
Stencil Magic® Stencil adhesive spray
- Delta
Stencil Magic® Stencil brushes – 1/8” and ¼”
Basics supplies:
- 1” Foam brush
- Small sea sponge
- Toothpick or pencil
- Paper plate
|
 When you see the “helping
hand” symbol on a project, it means you may need adult
supervision to do the project. Always use care when using
tools or a heat source. Be careful and safe!
When you see the “helping
hand” symbol on a project, it means you may need adult
supervision to do the project. Always use care when using
tools or a heat source. Be careful and safe!
|
Note:
for best results, please take a moment to review
the directions on all product packaging before beginning your
project
Instructions:
1. Using the 1” foam brush apply two
smooth even coats of light ivory paint to each brick. Let
dry.
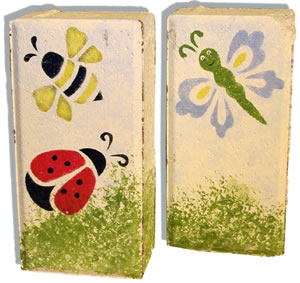
2. Pour a small puddle of blue mist and leaf green paint on
a paper plate. Dampen a sea sponge and dip into the blue paint.
Dab excess paint off on the paper plate. Using a pouncing
motion lightly apply color to the upper 2/3’s of each
brick. Repeat this process using the green paint on the lower
1/3 section of each brick. (refer to photo) Let dry.
3. Following the directions on the packaging mist the back
of the stencil with stencil adhesive spray. Position the ladybug
portion of stencil on one brick. Using the stencil brushes
apply red paint to the ladybug wings and black paint to the
body, head and antennae. Reposition the stencil to add the
black dots on the wings.
4. The bee is completed in the same manner using black and
crocus yellow paint. The butterfly is done in leaf green,
periwinkle blue, and crocus yellow.
5. If you wish to add eyes dip the handle end of the ¼”
brush into light ivory and dot in eyes. Let dry. Then using
the handle end of the 1/8” brush add a dot of black
on top of the light ivory dots. Finally add an even smaller
dot of light ivory on top of the black dots using the toothpick.
Also, use the toothpick or pencil to add a little smile line
with black paint.
Tip:
When stenciling, be sure and dab off excess paint from the
stencil brushes before applying paint to the stencil. That
way you’ll avoid having the paint seep under the stencil.
Then apply paint to the stencil using a light pouncing motion.
|
| |
|
|
Home
| Television | Projects
| Book Order | Helping
Kids | Teachers | Philosophy
E-mail questions about Hands On Crafts for Kids to info@craftsforkids.com
© Copyright 2004 Katherine Stull, Inc.
|


