| |
 |
|
|
|
|
 |
|
|
| |

by Annabelle Keller
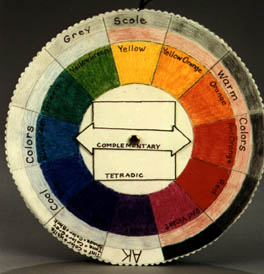
Invented by Louis Prang, the color
wheel is the beginning of any study on color. Make your own color
palette to use in all of your future projects. |
You will need:
 Soybean
Crayons -Yellow, Yellow Orange, Orange, Red Orange, Red, Red
Violet, Lilac (Violet), Blue Violet, Blue, Blue Green, Green
and Yellow Green Soybean
Crayons -Yellow, Yellow Orange, Orange, Red Orange, Red, Red
Violet, Lilac (Violet), Blue Violet, Blue, Blue Green, Green
and Yellow Green - #2 Pencil
- Black acrylic paint
- 1/2" x 9"
Styrofoam® wreath
- 14" x 17"
Heavyweight white paper
- Tacky glue
- 2 Brass 1" fasteners
- 10" Black 1/8"
ribbon
- Protractor Plus and
Protractor
- Scissors and decorative
scissors
- Jumbo paint brush
- Black fine permanent
marker
|
-
Paint the
outer edge and top of the Styrofoam wreath black. Let dry.
-
Draw a 5",
8" and 9" circle using the same center point. Divide
the circles into twelve 30 degree segments with the protractor.
Using the straight edge of the protractor, connect opposite
points by drawing straight lines between the edges of the 5"
circle and the 8" circle. Cut around the outer circle with
decorative edge scissors.
-
Color the
divided segments with crayons in this order: Yellow, Yellow
Orange, Orange, Red Orange, Red, Red Violet, Lilac (Violet),
Blue Violet, Blue, Blue Green, Green, and Yellow Green. In the
outer ring above each color write its name. Use "Violet"
above the Lilac (violet).
-
Using patterns,
trace and cut out the pointers for the types of color harmonies.
Draw black lines around the borders of the pointers. Print pointer
name along one edge. Make a small hole in the center of the
color wheel and each of the pointers. With the double complementary
closest to the wheel and the split complementary on top, fasten
the pointers to the center of the color wheel with the brass
fastener. Make sure they turn freely.
-
Glue the
color wheel to the top of the wreath. Punch a 1" deep hole
in the center of the wreath edge with a toothpick. Fold the
ribbon in half then knot the ends together. Glue the ribbon
knot in the hole, pushing in place with the toothpick.
|
Home
| Television | Projects
| Book Order | Helping
Kids | Teachers | Philosophy
E-mail questions about Hands On Crafts for Kids to info@craftsforkids.com
© Copyright 2004 Katherine Stull, Inc.
|


